on
ebs-bootstrap: Simplifying Stateful EC2 Workloads
Preface
Managing stateful workloads on AWS EC2 instances can be a complex undertaking. In this blog post, we’ll explore the challenges of block device management on AWS Nitro EC2 instances, delve into the intricacies of NVMe block devices, and introduce ebs-bootstrap - a powerful tool that simplifies the management of stateful EC2 workloads by ensuring stable and predictable device mapping.
Objective
Your task is to migrate a stateful application from On-premise to AWS. You have decided that this application should run on a dedicated EC2 server, as containerisation was deemed unfeasible. This application experiences significant strain through I/O intensive workloads. A persistent EBS volume, whose lifecycle exists separately from the EC2 compute, is the only sensible option for maintaining statefulness.
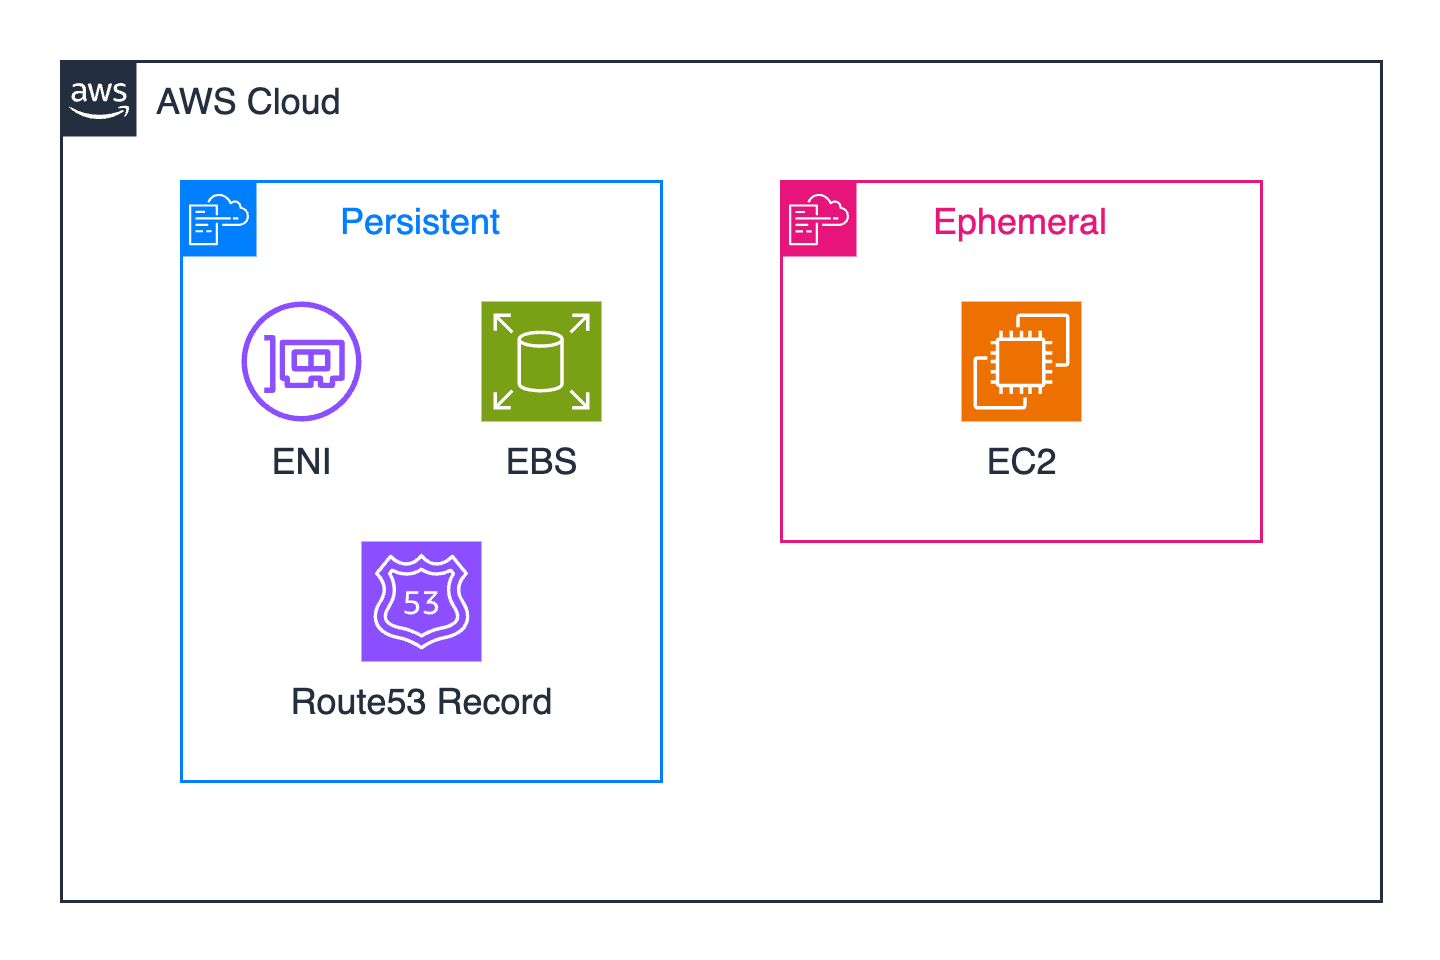
As an advocate for configuration as-code, you create two CloudFormation stacks: persistent and ephemeral.
- Persistent: Provisions resources like the aforementioned EBS volume, ENI (Elastic Network Interface) and Route 53 record. This CloudFormation stack introduces a persistent storage and networking layer to our application.
- Ephemeral: Provisions an EC2 instance with a relevant user data script to bootstrap the application. We can immediately blow away this CloudFormation stack and re-provision it with minimal application downtime and no data-loss (assuming graceful shutdown).
Power in Determinism
To enable applications to consume the persistent EBS volume, it must be formatted with a filesystem, such as xfs or ext4, and then mounted to a specific location, such as /mnt/app.
Newly created EBS volumes are essentially blank canvases, meaning you should anticipate that they will be unformatted upon their initial boot.
For instance types like the t2.micro, which are not built on the Nitro system, preparing EBS volumes is trivial because device names are allocated deterministically.
Resources:
  Instance:
    Type: AWS::EC2::Instance
    Properties:
      KeyName: !Ref KeyName
      ImageId: !Ref LinuxAmi
      InstanceType: "t2.micro"
      SecurityGroupIds:
        - !Ref SecurityGroup
      SubnetId: !Ref SubnetId
      Volumes:
        - Device: "/dev/sdb"
          VolumeId: !ImportValue Persistent-EbsVolume
After attaching the persistent EBS volume with the designated device name /dev/sdb to the EC2 instance, we can SSH into the machine to confirm that the EBS volume is indeed attached and recognised as /dev/xvdb. This consistent mapping behaviour between /dev/sd[a-z] to /dev/xvd[a-z] is a documented behaviour of previous generation instances that were powered by the Xen hypervisor.
Depending on the block device driver of the kernel, the device could be attached with a different name than you specified. For example, if you specify a device name of
/dev/sdh, your device could be renamed/dev/xvdhor/dev/hdh~ Device names on Linux instances
$ lsblk
NAME    MAJ:MIN RM SIZE RO TYPE MOUNTPOINT
xvda    202:0    0   8G  0 disk               # Root EBS Volume
└─xvda1 202:1    0   8G  0 part /
xvdb    202:16   0  10G  0 disk               # Persistent EBS
Armed with this knowledge, we can craft a user data script that determines whether a device requires formatting and mounts it to an appropriate location within the file system.
#!/bin/bash

# Format device if it has no file system
persistent="/dev/xvdb"
if [[ "$(file -s "${persistent}")" == "${persistent}: data" ]]; then
  mkfs.ext4 "${persistent}"
fi

# Create mountpoint and mount device
mkdir -p /mnt/app
mount "${persistent}" /mnt/app
The key point I want to emphasise is our ability to programmatically modify the block device hinged on its having a deterministic identifier. This allowed us to know the device name from the host’s perspective in advance. Consider the complexity of rolling out schema changes to a database table whose name varied with the time of day—such unpredictability would complicate management and automation efforts significantly.
AWS Nitro System 🔥
t2.micro instances are excellent for quick spike attempts but not so much for running production workloads. AWS offers the Nitro System, which powers the latest generation of EC2 instance types, delivering increased computing and storage capabilities required by modern enterprise workloads.
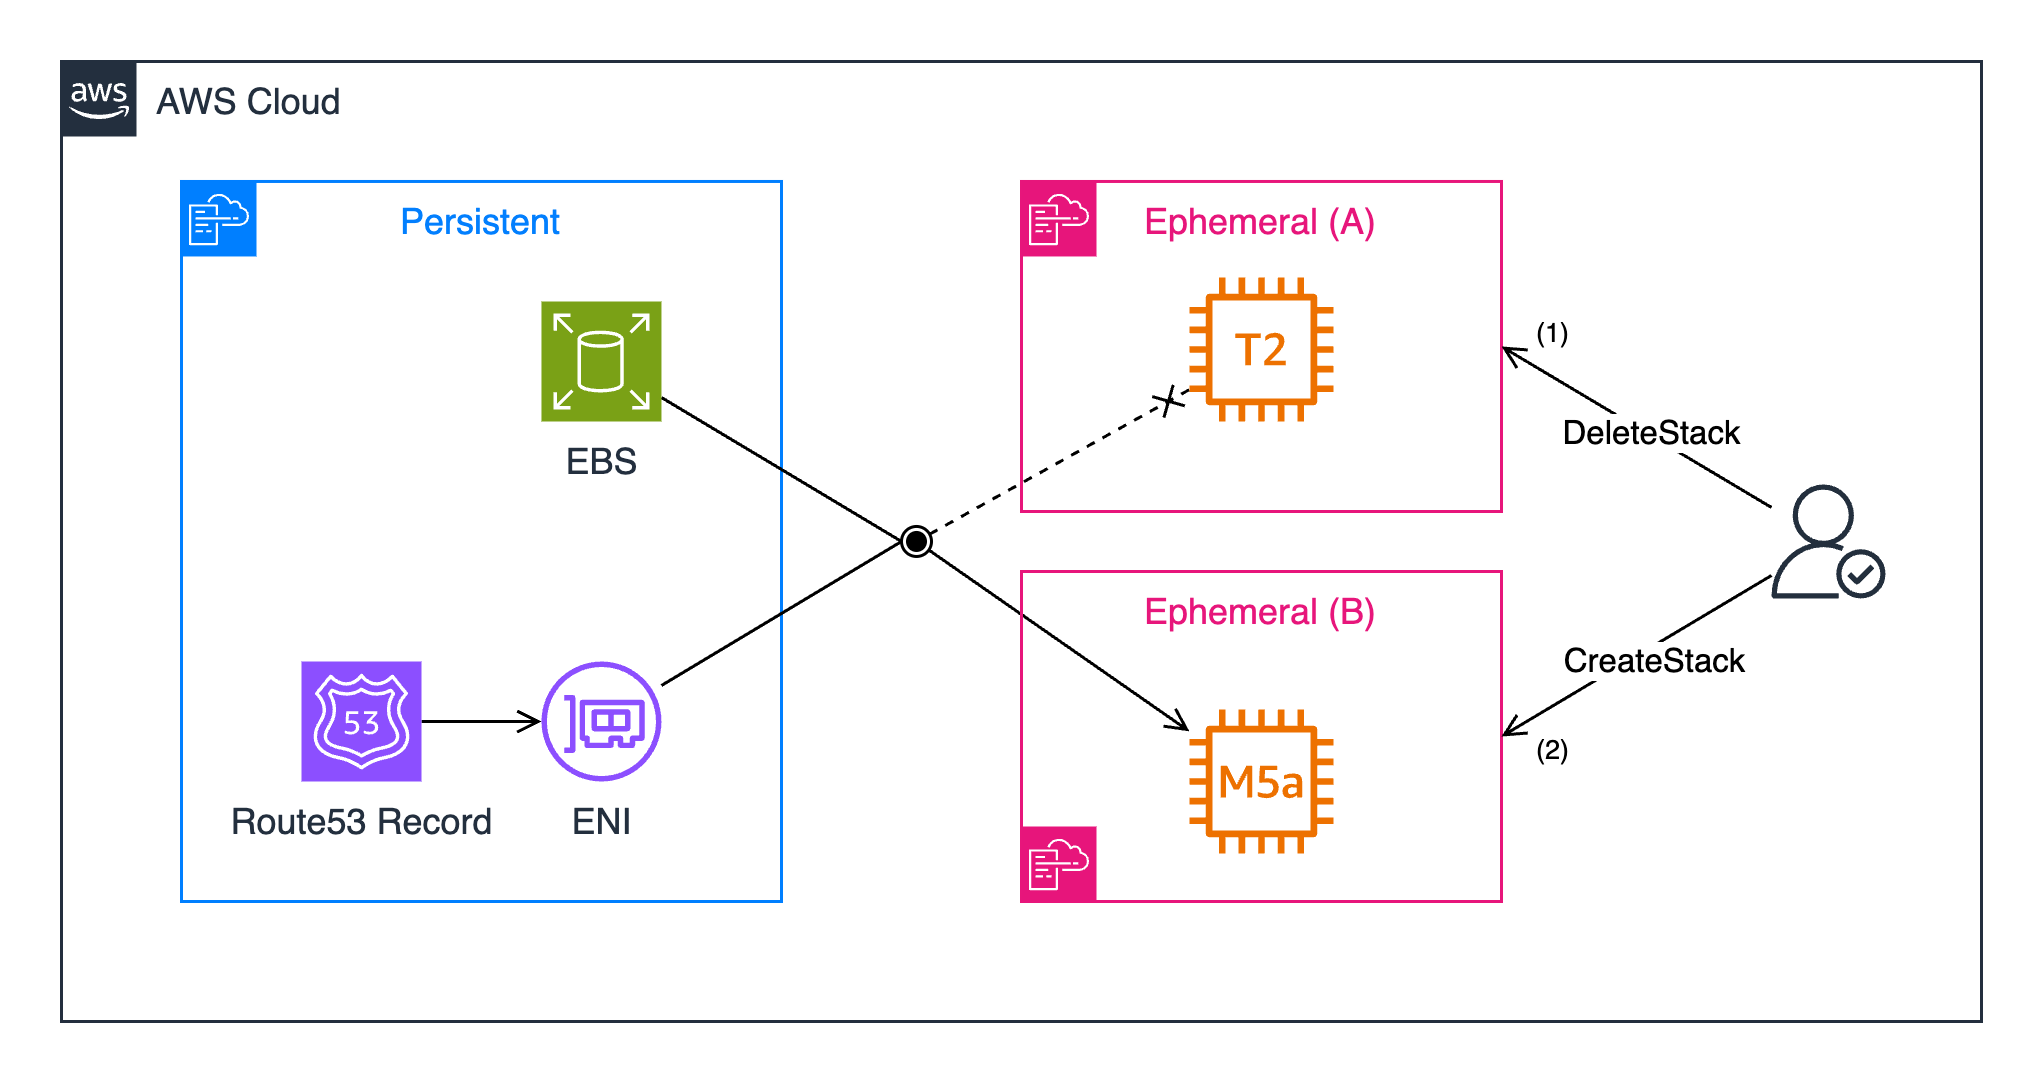
Assuming that your manager is satisfied with the application migration configuration, your next responsibility is to prepare it for production. After researching your application’s memory and compute requirements, the Nitro-enabled m5a.large instance type seems to be the most appropriate choice.
You delete your ephemeral CloudFormation stack and then re-provision it alongside the modification to the instance type, highlighting the power of separating our persistent resources from our compute.
Upon accessing the box via SSH, we observed an unusual occurrence. CloudFormation assigned the EBS volume the device name /dev/sdb, which was renamed to /dev/nvme1n1 on the host. With regards to our current architecture, we can make the assumption that /dev/nvme0n1 will always be assigned to the root EBS volume and /dev/nvme1n1 will always be assigned to the persistent EBS volume.
$ lsblk
NAME          MAJ:MIN RM SIZE RO TYPE MOUNTPOINT
nvme0n1       259:1    0   8G  0 disk               # Root EBS Volume
├─nvme0n1p1   259:2    0   8G  0 part /
└─nvme0n1p128 259:3    0   1M  0 part
nvme1n1       259:0    0  10G  0 disk               # Persistent EBS Volume
Device Name Dilemmas
While your application is a stateful workload, a software component operates on an ephemeral scratch disk. If we can point this scratch disk to high throughput and I/O block storage, there are some serious potential performance gains. Instance Store is a perfect candidate for this requirement as it provides temporary high-speed NVMe block storage on specific Nitro-enabled instance types.
While the m5a.large instance type does not support Instance Store, the closely related m5ad.large instance type is packaged with a 75 GB Instance Store volume. You explicitly assign the block device mapping /dev/sdh to the Instance Store volume, aligning with your configuration as-code standards.
Resources:
  Instance:
    Type: AWS::EC2::Instance
    Properties:
      KeyName: !Ref KeyName
      ImageId: !Ref LinuxAmi
-     InstanceType: "m5a.large"
+     InstanceType: "m5ad.large"
      SecurityGroupIds:
        - !Ref SecurityGroup
      SubnetId: !Ref SubnetId
      Volumes:
        - Device: "/dev/sdb"
          VolumeId: !ImportValue Persistent-EbsVolume
+     BlockDeviceMappings:
+       - DeviceName: "/dev/sdh"
+         VirtualName: ephemeral0
Stopping or replacing an instance erases the file system of the Instance Store device. Therefore, we should extend our user data script to format and mount the Instance Store volume. Let us retrieve the device name of the Instance Store volume by SSHing into the… Oh, well, that was unexpected.
$ lsblk
NAME          MAJ:MIN RM  SIZE RO TYPE MOUNTPOINT
nvme1n1       259:0    0 69.9G  0 disk               # Instance Store Volume
nvme0n1       259:2    0    8G  0 disk               # Root EBS Volume
├─nvme0n1p1   259:3    0    8G  0 part /
└─nvme0n1p128 259:4    0    1M  0 part
nvme2n1       259:1    0   10G  0 disk               # Persistent EBS Volume
The persistent EBS volume that we previously allocated the device name of /dev/nvme1n1 has now changed to /dev/nvme2n1. The previous assumption that the persistent EBS volume is always assigned the device name /dev/nvme1n1 no longer holds. Determinism has been broken, causing quite the dilemma.
The Problem
When I personally encountered this predicament, the following questions came to mind.
- Why are device names unpredictable on the AWS Nitro System?
- How will this behaviour affect our ability to manage multiple block devices as code?
Why Did Our Device Names Change?
This particular behaviour we experienced is unique to the AWS Nitro class of instance types.
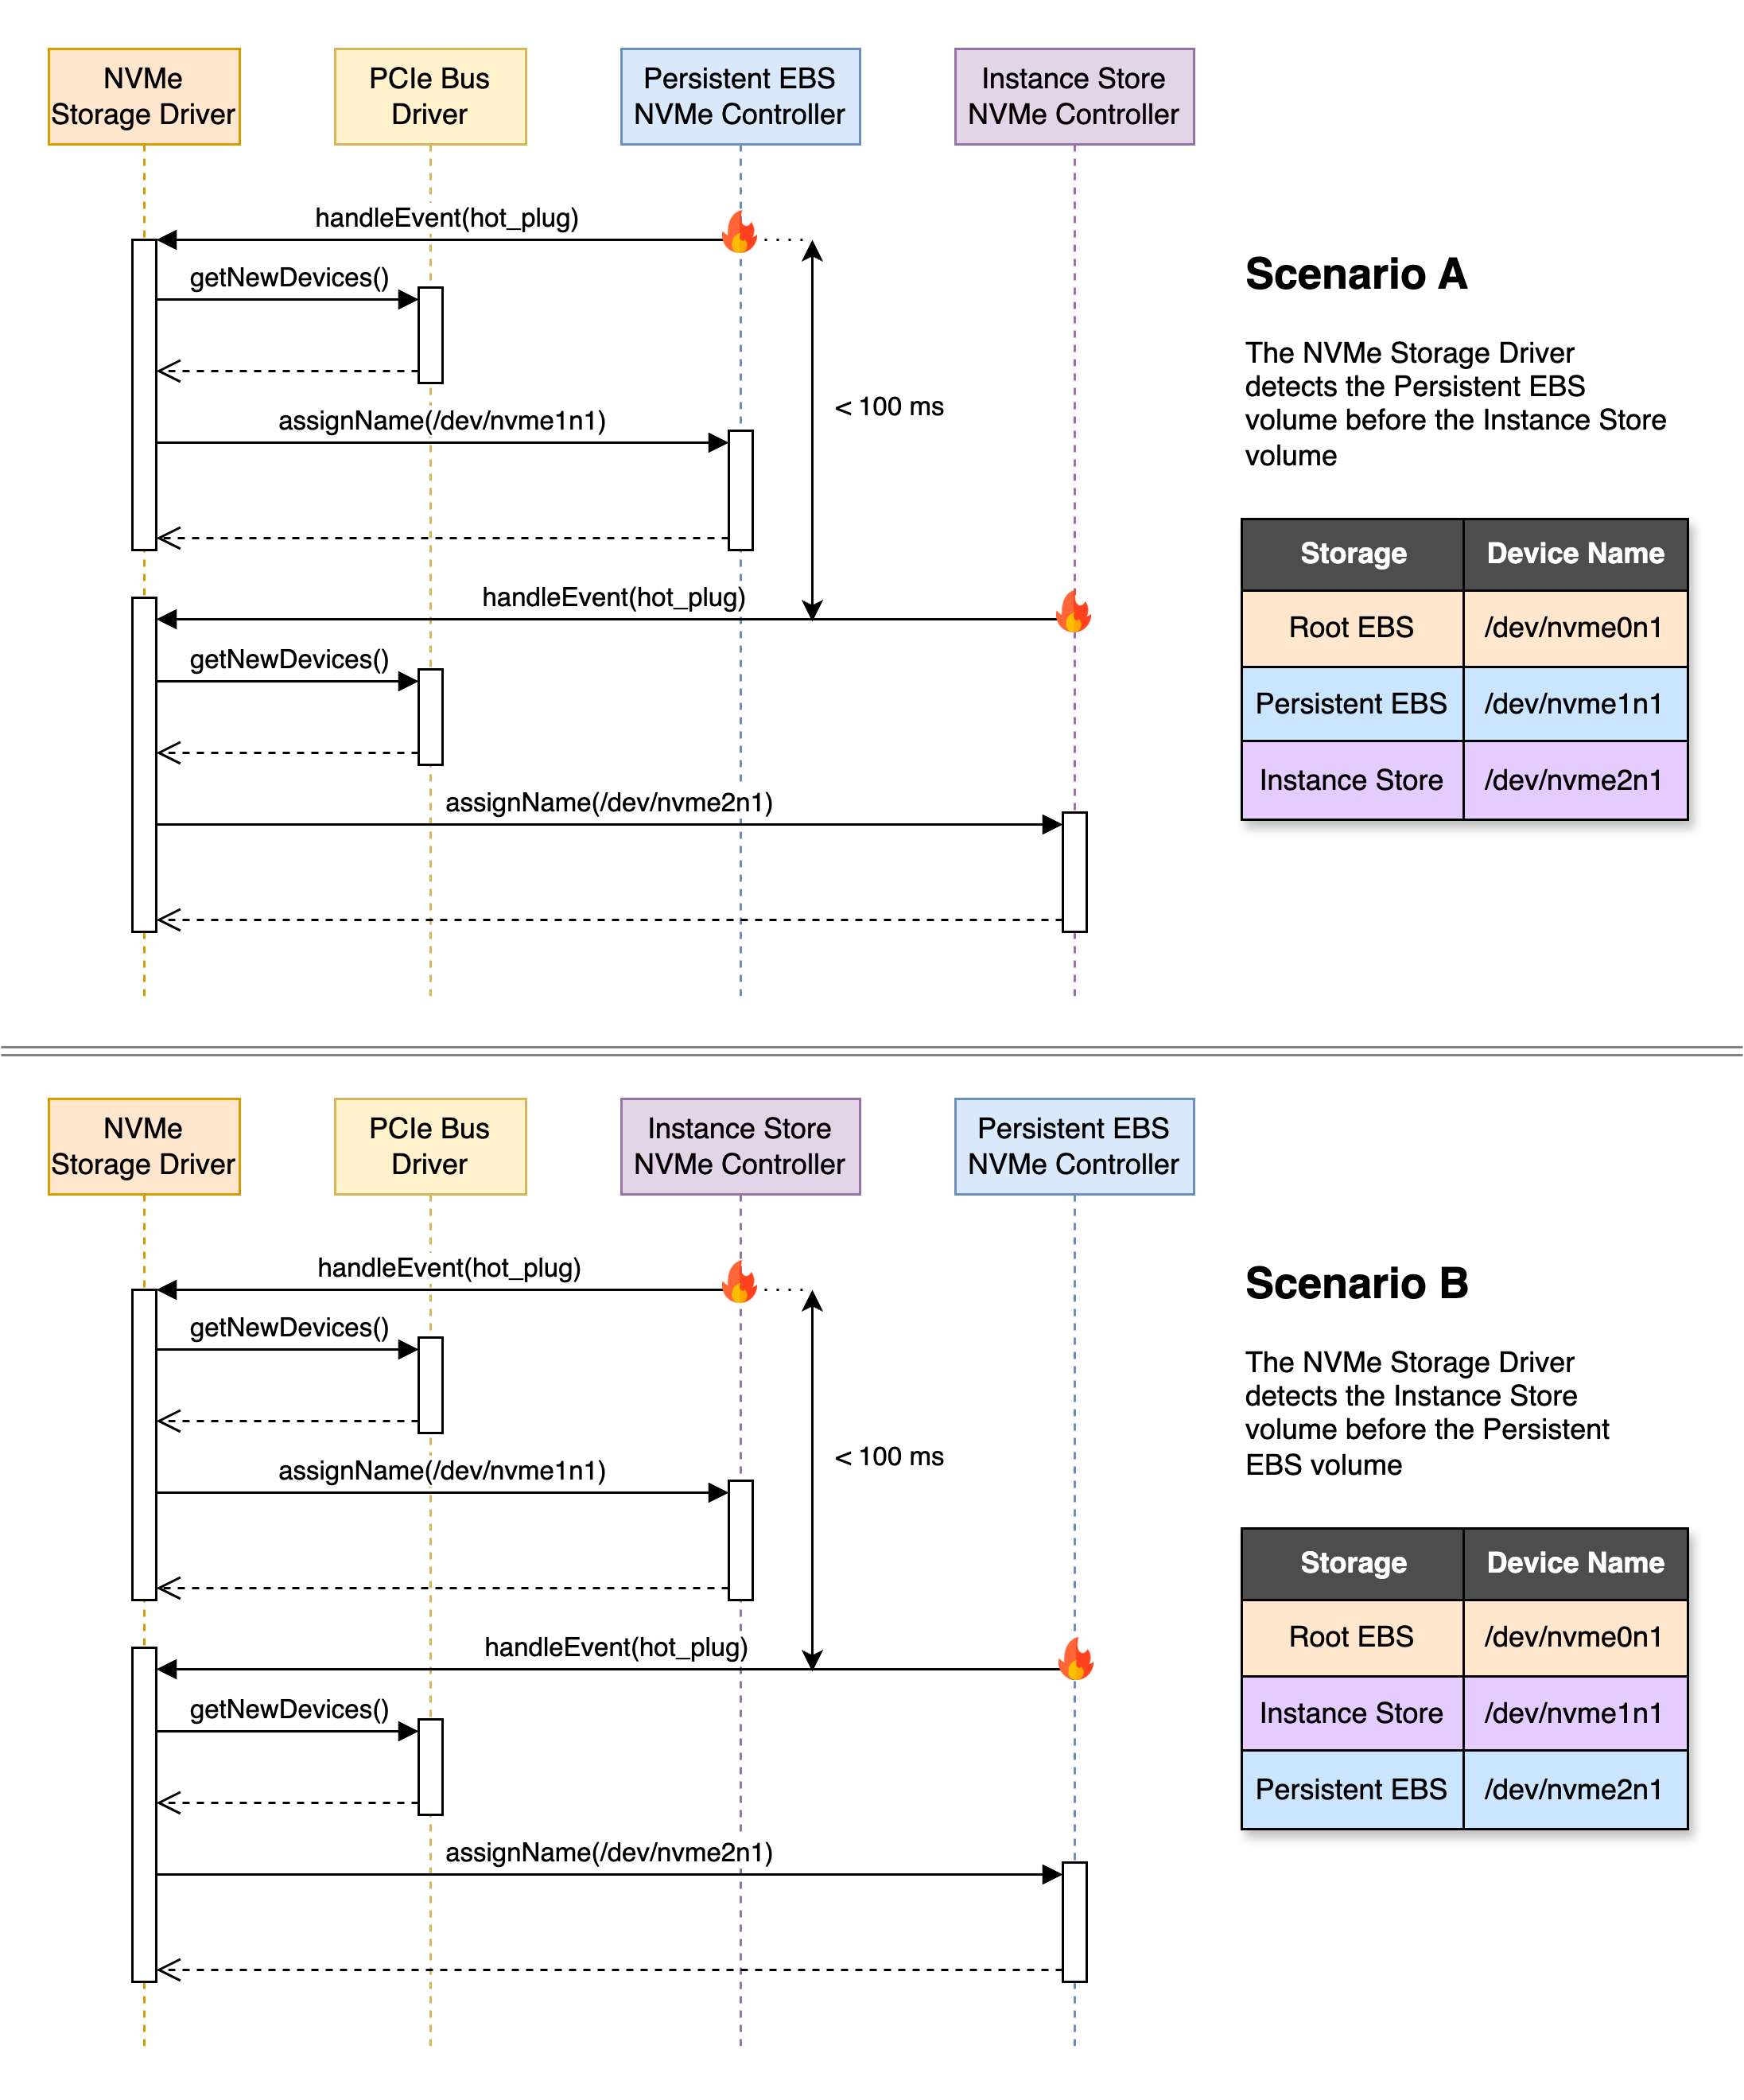
EBS volumes are exposed as NVMe block devices on instances built on the Nitro System. The block device driver can assign NVMe device names in a different order than you specified for the volumes in the block device mapping ~ Amazon EBS and NVMe on Linux instances
The storage driver installed on the Nitro class of instances recognises all block devices (EBS and Instance Store) as NVMe devices and assigns them an incremented device name following the pattern of /dev/nvme[0-26]n1 on a first-in-first-out (FIFO) basis. The NVMe storage driver on Nitro-based instances assigns NVMe device names in a manner that can seem random, as the sequence of device hot-plug events is subject to variations that are often slight (<100 ms) yet significant, potentially leading to a completely random order of recognition.
Can We Still Manage Block Devices As Code?
We can only manage our multiple block devices as code once we have an identifier that remains stable across reboots and instance replacements. What are our options for tackling this challenge?
File System UUID
A file system utility tool will assign a block device a randomly generated UUID during a format operation.
$ sudo mkfs.ext4 /dev/nvme2n1
$ sudo blkid /dev/nvme2n1
/dev/nvme2n1: UUID="9f03eea6-d009-43ec-b166-af52f1eb7931" BLOCK_SIZE="4096" TYPE="ext4"
Once set, this UUID will remain bound to the lifecycle of the block device. While this does address our immediate concern around stability, we cannot predict what these UUIDs will look like ahead of time. Specific file systems utilities, like mkfs.ext4, allow an administrator to override the allocated UUID. However, this feature is not broadly supported across other popular file systems, and we should avoid becoming dependent on a niche implementation detail.
Disk Labels
Disk labels are a method of identifying block devices in a more human-readable and persistent way compared to traditional device names assigned by the operating system, such as /dev/sdb or /dev/nvme1n1.
$ sudo e2label /dev/nvme2n1 "pers-a"
$ sudo blkid -l -t LABEL="pers-a"
/dev/nvme2n1: LABEL="pers-a" UUID="9f03eea6-d009-43ec-b166-af52f1eb7931" BLOCK_SIZE="4096" TYPE="ext4"
Like UUIDs, a disk label remains bound to the lifecycle of a block device. Unlike UUIDs, there is no randomness around the generation/allocation process. Yet, we encounter a familiar challenge: assigning device labels in environments where device names fluctuate. Despite this, device labels offer a consistent method for categorising devices. They may prove themselves useful in the future.
NVMe Vendor Information
What if I told you there was a mechanism to recover the block device mapping we assigned in CloudFormation?
The physical NVMe device in a high-end gaming desktop and the virtualised NVMe device exposed to your AWS EC2 instance share a common trait: they present themselves as a controller that acts as an interface between your operating system’s NVMe storage driver and the underlying block-based storage. The way that the AWS Nitro System exposes virtualised NVMe controllers to the EC2 instance is light-weight but complex. For all intents and purposes, an administrator can interact with the NVMe controller, from the user space, using ioctl—a Linux syscall designed for making device-specific requests.
For a deeper understanding of the components that enable the AWS Nitro architecture, I suggest watching the AWS re:Inforce presentation titled “Security design of the AWS Nitro System”. This resource helped me comprehend how EC2 instances powered by Nitro acquire their storage and networking capabilities.
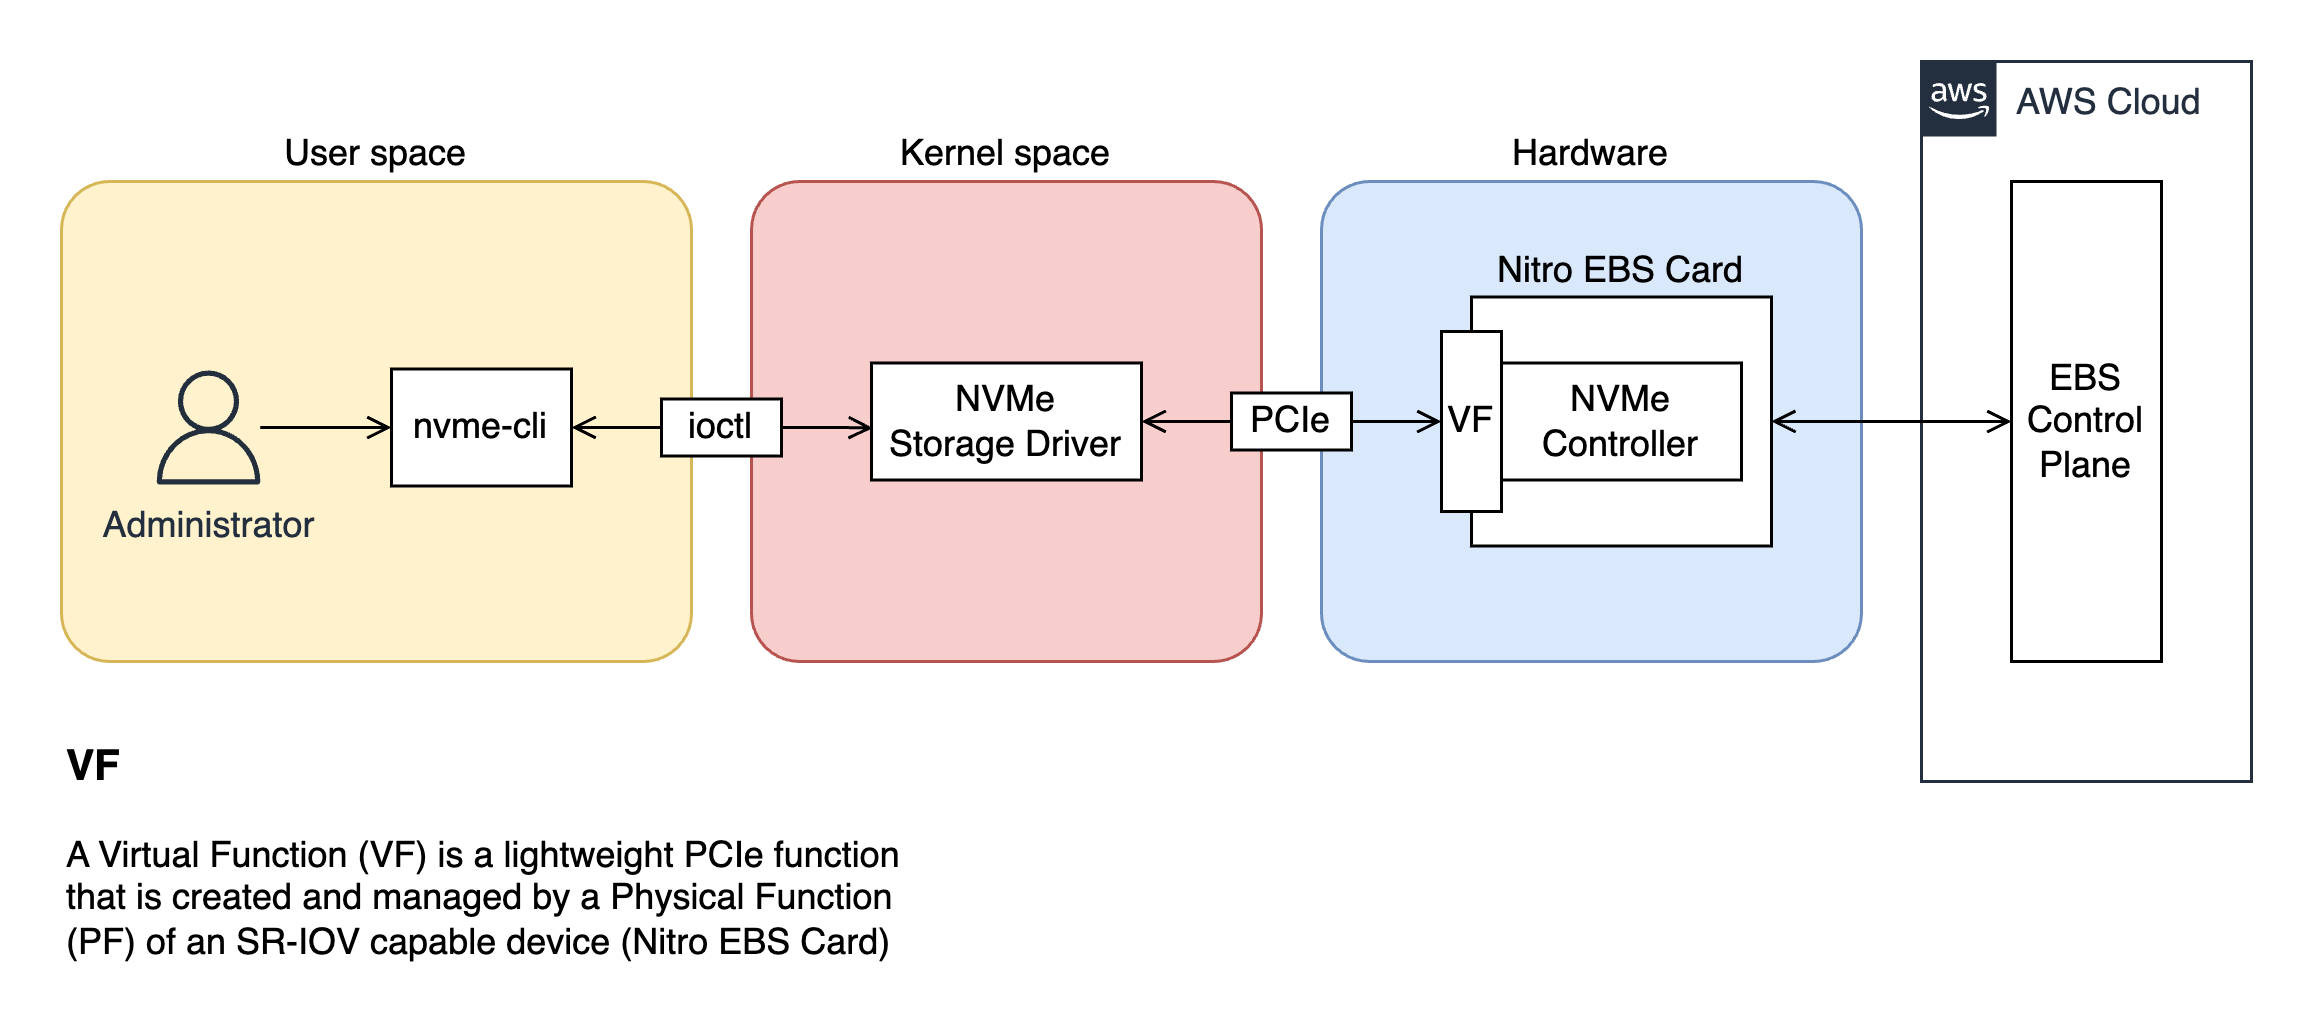
nvme-cli is a Linux tool that uses ioctl to allow administrators to interact with NVMe devices to change settings and retrieve manufacturer, model number and vendor-specific metadata. Using this tool, it is possible to access the declared block device mappings in the vendor-specific metadata (vs[]) of the the EBS and Instance Store volumes.
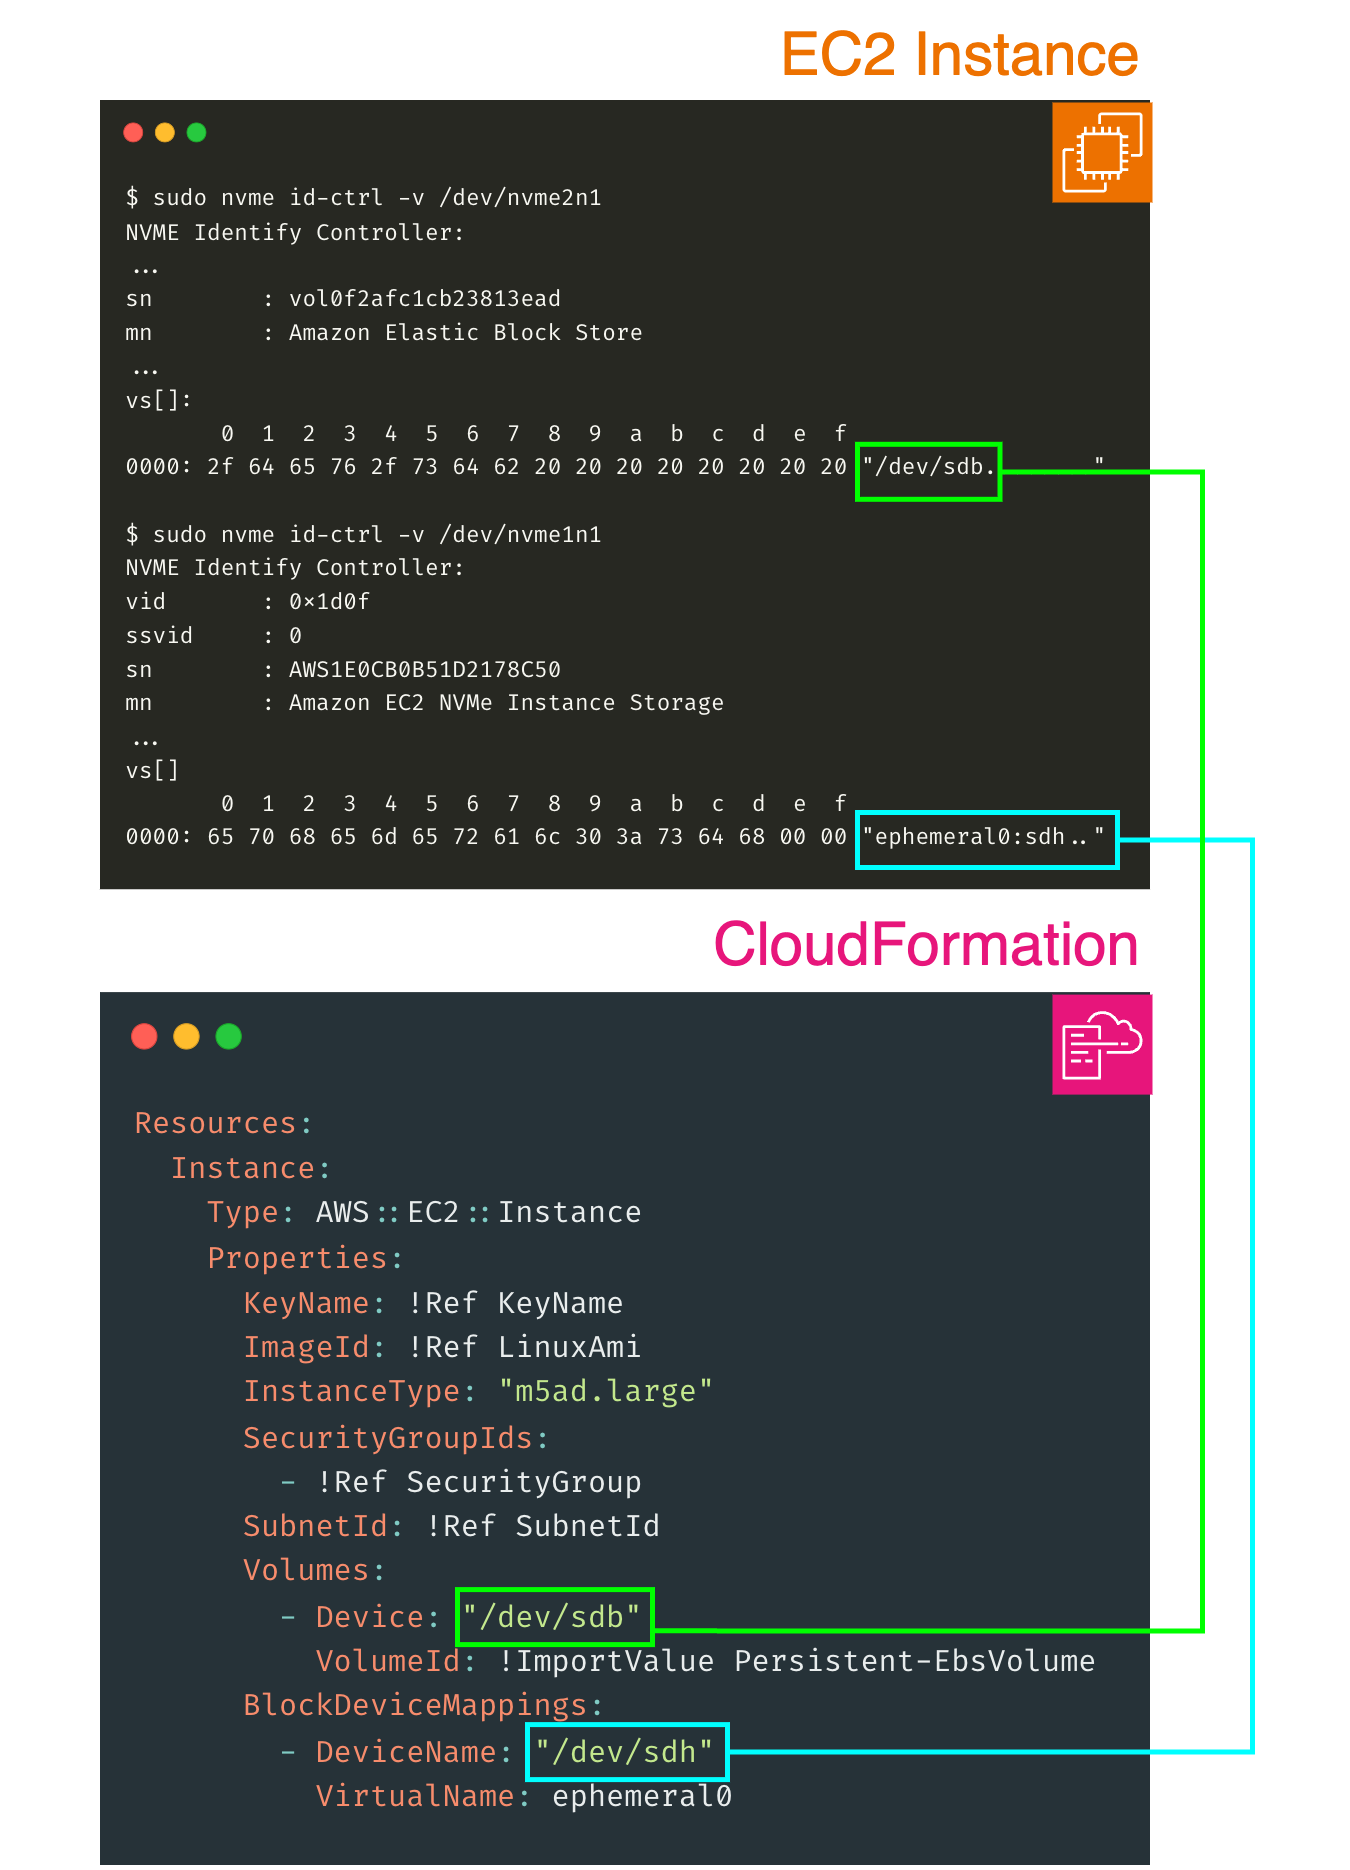
Eureka! We’ve discovered our solution. This mechanism enables us to retrieve the assigned block device mappings from dynamically assigned NVMe device names. AWS have developed ebs-nvmeid, a Python-based tool, which documents a programmatic approach for extracting this mapping for EBS volumes. The invocation of ebs-nvmeid within a udev rule, which is automatically triggered upon the attachment of an EBS volume in AWS Linux AMIs and FreeBSD AMIs, underscores the intentionality behind this feature. This mechanism is not a makeshift workaround; rather, it is a deliberate attempt to deliver a stable interface for block device management on the AWS Nitro System.
$ sudo /sbin/ebsnvme-id /dev/nvme2n1
Volume ID: vol-0f2afc1cb23813ead
/dev/sdb
The Solution
Navigating the dynamic device naming behaviour necessitated a deep exploration into the interactions between the operating system and virtualised NVMe controllers. Our journey highlighted the urgent need for a simplified and as code solution to alleviate the complexities of migrating stateful workloads to the AWS Nitro System. Enter ebs-bootstrap.

Whether you’re a sceptical Platforms Engineer hesitant to relinquish control over your stateful devices, or a DevOps professional in pursuit of fully autonomous workflows, ebs-bootstrap presents a versatile, user-friendly solution designed to meet your specific requirements. With support for ext4 and xfs file systems, alongside capabilities for file system formatting, labelling, resizing, and mounting, ebs-bootstrap equips you with all the necessary tools for efficient AWS block device management.
Let’s see how you can bring some predictability into your block device management strategy using ebs-bootstrap.
Declare Desired State
By default, ebs-bootstrap reads its configuration from a YAML file located at /etc/ebs-bootstrap/config.yml. This file allows for the precise setup of each block device, using identifiers that match the assigned block device mappings from CloudFormation, bridging configuration with deployment.
Certain Linux workloads demand specific ownership and permission settings for the mount point to ensure secure and compliant operations. To accommodate such requirements, ebs-bootstrap provides the flexibility to define the user and group ownership for any mount point, thus tailoring to the nuanced needs of different applications.
---
# /etc/ebs-bootstrap/config.yml
defaults:
  mountOptions: defaults
devices:
  /dev/sdb:
    fs: xfs
    label: persistent
    user: ec2-user
    permissions: 0700
    mountPoint: /mnt/persistent/a
  /dev/sdh:
    fs: ext4
    label: ephemeral
    group: 0
    permissions: "755"
    mountPoint: /mnt/ephemeral/0
Aligning Volume to Desired State
With the configuration set, it’s time to launch the ebs-bootstrap command:
$ sudo ebs-bootstrap -mode force
🔵 Nitro NVMe detected: /dev/nvme1n1 -> /dev/sdh
🔵 Nitro NVMe detected: /dev/nvme0n1 -> /dev/xvda
🔵 Nitro NVMe detected: /dev/nvme2n1 -> /dev/sdb
🟠 Formatting larger disks can take several seconds ⌛
⭐ Successfully formatted /dev/nvme2n1 to xfs
⭐ Successfully formatted /dev/nvme1n1 to ext4
🟠 Certain file systems require that devices be unmounted prior to labeling
⭐ Successfully labelled /dev/nvme2n1 to 'persistent'
⭐ Successfully labelled /dev/nvme1n1 to 'ephemeral'
⭐ Successfully created directory /mnt/persistent/a
⭐ Successfully created directory /mnt/ephemeral/0
🟠 Devices mounted to a location, not specified in the configuration, will be unmounted
⭐ Successfully mounted /dev/nvme2n1 to /mnt/persistent/a (defaults)
⭐ Successfully mounted /dev/nvme1n1 to /mnt/ephemeral/0 (defaults)
⭐ Successfully changed ownership (1000:0) of /mnt/persistent/a
⭐ Successfully change permissions of /mnt/persistent/a to 0700
🟢 Passed all validation checks
The intelligence that ebs-bootstrap possesses to recover the CloudFormation assigned block device mappings from the dynamically generated NVMe device names was ported to Golang from the Python-based implementation of ebs-nvmeid. However, we extend their implementation by not only supporting EBS volumes but also Instance Store volumes.
We’ll delve into the specifics of the mode attribute later. For the moment, understand that executing this command initiates a conservative effort to align all configured block devices with their intended states. The term “conservative” is key here; ebs-bootstrap is designed with built-in safeguards to avert potentially destructive actions, such as erasing a block device’s filesystem due to a change in the fs attribute from ext4 to xfs.
$ diff /etc/ebs-bootstrap/config.yml /etc/ebs-bootstrap/config.yml.prev -U 1
+++ /etc/ebs-bootstrap/config.yml	2024-04-07 02:10:56.626718151 +0000
--- /etc/ebs-bootstrap/config.prev.yml	2024-04-07 02:10:24.084040602 +0000
@@ -11,3 +11,3 @@
   /dev/sdh:
-    fs: ext4
+    fs: xfs
     label: ephemeral

$ sudo ebs-bootstrap -mode force
🔵 Nitro NVMe detected: /dev/nvme1n1 -> /dev/sdh
🔵 Nitro NVMe detected: /dev/nvme0n1 -> /dev/xvda
🔵 Nitro NVMe detected: /dev/nvme2n1 -> /dev/sdb
🔴 /dev/nvme1n1: Can not format a device with an existing ext4 file system
Handle Reboots
If the system were to reboot in the current state, it would lose all the mounts that have been established. This can be rectified by adding fstab entries that are identified by the device labels assigned by ebs-bootstrap.
# Adding fstab entry for persistent volume
$ echo "LABEL=persistent  /mnt/persistent/a xfs defaults  0 2" \
  | sudo tee -a /etc/fstab

# Attempt to mount all block devices mentioned in /etc/fstab (No-op)
$ mount -a -v
/                        : ignored
/boot/efi                : already mounted
/mnt/persistent/a        : already mounted
Have I forgotten to add an fstab entry for the Instance Store volume? No. Recall that Instance Store volumes have their filesystem and any assigned device labels erased when the instance is restarted. While we successfully delegated the responsibility of mounting persistent volumes to the operating system using fstab entries, ephemeral disk still needs to be formatted and mounted by ebs-bootstrap.
Control vs Convenience
In my view, every infrastructure-as-code tool sits somewhere on the spectrum between control and convenience. Consider Ansible, for example, which veers towards convenience; we run playbooks against production systems expecting them to execute fully without human oversight. On the other hand, Terraform tends towards control, often requiring a human to review the plan before any changes are applied.
When it comes to block devices, the stakes can be high—particularly with databases, where the persistence of data is crucial. Conversely, for ephemeral workloads where data longevity is not a concern, a relaxed approach is afforded. ebs-bootstrap recognises the varying sensitivities of block device usage. It doesn’t just settle at one point on the control versus convenience spectrum. Instead, it offers developers the flexibility to adjust the level of decision-making authority of ebs-bootstrap for each device.

Prioritising Portability
One of the significant advantages of programming our tool in Golang is the ability to produce a single statically compiled binary that is compatible with a wide range of common Linux distributions and architectures. This eliminates the complexity of managing Python runtimes and dependencies—instead, a ~4 MB binary suffices. This binary is readily available for download from our GitHub Releases page. We cater not only to the widespread x86_64 architecture but also to aarch64, expanding coverage to the growing Graviton user base.
$ curl -L \
  -o /tmp/ebs-bootstrap \
  "https://github.com/reecetech/ebs-bootstrap/releases/latest/download/ebs-bootstrap-linux-$(uname -m)"
$ sudo install -m755 /tmp/ebs-bootstrap /usr/local/sbin/ebs-bootstrap
Conclusion
Throughout this journey, we’ve delved into the challenges that dynamic NVMe device names introduce when managing stateful workloads on the AWS Nitro System. We showcased how ebs-bootstrap tames this complexity, applying an as-code methodology to block device management.
Yet, what we’ve covered so far is merely the tip of the iceberg regarding ebs-bootstrap’s full potential. For a deeper dive into advanced usage and comprehensive documentation, consider the following resources:
-
GitHub: This project’s README provides a pattern utilising device labels to guarantee block devices are consistently mounted upon reboot.
-
CloudFormation: Discover a CloudFormation template that deploys an Ubuntu instance configured to orchestrate EBS and Instance Store volumes with
ebs-bootstrap. -
Documentation: Access an informative guide detailing the YAML configuration file schema used by
ebs-bootstrap, along with a thorough explanation of command-line flags that can override specific device attributes.